Monday, April 15, 2013

Ironman Dreams

When I was running my first marathon in St. Louis I passed a guy with an Ironman tattoo.
The guy on the left had the tattoo
Every since then I've always wondered, could I do an Ironman one day? Yesterday, Brian and I got one step closer by purchasing road bikes.

Adding triathlons to our life seems like a natural transition (I was even a competitive swimmer in the past). We've been talking about bikes for so long that we just decided to do it. After a few weeks of research, and swallowing the price tags (biking is way more expensive than running!), we came home yesterday with two shiny bikes.

I ended up with the Specialized Ruby after riding a few bikes. I really did not think I would feel a difference while riding and was going to make my decision on price, but man was I wrong. Some bikes were just uncomfortable. Others felt to short lengthwise. This one was just right. Think Goldilocks and the Three Bears.

When we got home we of course had to go out on a ride. Although the ride was short (I was tired from multiple test drives and my 8 mile run yesterday) it felt good and I can't wait to get more comfortable and really learn how to road bike.

Unfortunately, it is going to snow tomorrow and Wednesday so our riding dreams will need to be postponed until there is nicer weather. Thanks Colorado for never ending winter.

Does anyone have any Ironman advice? I am really considering this for a goal in the next few years.

In other news, my brother in law Jeff is running the Boston Marathon today! Go Jeff Go!! I wish I was there to run with him but hey, maybe next year right?

Alright I need to start getting ready for work, so I'll leave you will a weekly meal plan.

Sunday
Melon Mojito Fish Tacos with grilled corn

Monday
Raspberry chipotle Pork with salad

Tuesday
Leftovers

Wednesday
Mexican casserole with Broccoli

Thursday
Leftovers

Friday
Date Night


Friday, April 12, 2013

Salsa Verde Chicken

I didn't go for a run this morning. I just couldn't drag myself out of bed...now that I'm up though I wish I had gotten up earlier. Oh well. Maybe I will go for a run after work instead.

The idea of running after work is a good one but unfortunately rarely happens because after standing for most of the day the last thing I feel like doing is running when I get home. Typically, my pajamas are calling my name and I just want to relax.

At least it's Friday right?

The other night for dinner I made Salsa Verde Chicken with Cilantro Lime Quinoa. Brian had rave reviews of the meal, saying it tasted (and smelled) like something he would order in a restaurant. The meal was also incredible easy.


Ingredients
- 1 lb chicken tenders (chicken breasts/thighs would work well too)
- 1/4 teaspoon paprika
- 1/2 teaspoon dried oregano
- 1 yellow onion thinly sliced
- 1 green bell pepper thinly sliced
- 2 teaspoons vegetable oil
- 16 ounces salsa verde made with tomatillos (I used the Target brand)
- salt and pepper to taste

1.) Heat 1 teaspoon of oil over medium high heat in a large saute pan
2.) Add the chicken, season with paprika, oregano, salt and pepper and then brown on both sides (about 3-4 minutes per side). The chicken does not need to be cooked through at this point because it will cook more later.
3.) Remove the chicken from the pan, add the second teaspoon of oil and add the onions and peppers
4.) Saute the onions and peppers until browned and softened
5.) Add the chicken back in the pan and cover with the salsa
6.) Reduce the heat to a simmer, partially cover and cook for 10 minutes
7.) Serve with quinoa or rice and Enjoy!


Thursday, April 11, 2013

Cilantro Lime Quinoa

Does this week seem to be flying by to anyone else? I can't believe it's already Thursday. Not that I'm complaining, we're only really 2 days away from the weekend!

The weather here has been very cold and snowy so far but supposedly is going to warm up today through the weekend. I'm hoping to do some outdoor running tomorrow and on Saturday. So far this week I have done a 4 mile run on Tuesday and then a sprint workout yesterday. The workout yesterday was made up of 7-400 meter runs at 9min/mile pace with a 0.2 mile walking interval in between.

Running this week has been great so far. I'm hoping to continue the trend with a 3 mile run tomorrow and then an 8 mile run this weekend.


When it comes to cooking, I'm all about taking something you know and modifying it slightly to make it new.

Cilantro Lime Quinoa Ingredients
- 1 recipe Perfect Quinoa 
- 1/3 cup chopped fresh cilantro
- zest and juice of 1 lime

1.) Cook the quinoa according the the directions
2.) Once the quinoa is cooked, stir in the the cilantro, zest, juice and season with salt and pepper
3.) Enjoy!

We enjoyed this quinoa along side Salsa Verde Chicken (recipe to follow tomorrow)


Wednesday, April 10, 2013

Greek burgers and homemade Tzatziki sauce

A few years ago, Brian and I were given a free grill. The grill is not the nicest but it has worked pretty well over the past few years. We've always said that once we settle down we will purchase a nice grill but now I'm not sure if we can wait that long.

The starter was out when we got the grill so we've been lighting it with a long lighter. Over the weekend we decided to go to Lowe's and pick up some new grates and starter to improve the grilling experience. When we were cleaning out the grill, we found some massive holes on the bottom of the grill as well as the elements that release the gas. No big deal we thought, at least it was clean now right?

Wrong. Now that the grill is clean it seems 75% of the gas comes out the holes in the back of the grill leaving just about no gas to heat the front. Bummer. I think the time has come to buy a new grill.

Anyone have any suggestions?

For these burgers, I whipped up some homemade light wheat burger buns and some tzatziki sauce.


Tzatziki sauce is one of the few condiments that I actually like. It just tastes so fresh that I can never get enough!

Ingredients for Tzatziki sauce
- 1 cup low fat plain yogurt (do not use flavored)
- 1 grated, peeled cucumber
- 3-4 tablespoons fresh chopped mint
- salt and pepper to taste

1.) Using paper towels or a kitchen towel, squeeze the cucumber to release the majority of the liquid. After squeezing you should have about 3/4 cup of grated cucumber.

2.) Mix the yogurt, cucumber and 3 tablespoons of mint. Taste for salt and pepper and then add more mint if you'd like.

3.) Keep in the refrigerator until you are ready to use and then enjoy! 

Ingredients for Greek Burgers
- 1 lb ground beef (mine was 88/12)
- 1 cup crumbled feta cheese
- 1 package frozen spinach, defrosted and squeeze dry
- 2 tablespoons fresh chopped mint
- pepper to taste

1.) Mix all the ingredients together and then divide into 4-6 burger patties (depending on how big you like them)

2.) Grill over medium high heat until cooked to your liking!

3.) Toast the buns then top with tzatziki and enjoy!


Tuesday, April 9, 2013

Turmeric rice with shrimp

Remember this weekend when I went running outside? Well this morning it decided to snow and be winter again.

Don't get me wrong, I love snow and winter but enough is enough! I even bought a new pair of flip flops over the weekend! Oh well, knowing Colorado it will probably be warm and sunny this weekend anyways.

The only good part about this snow is that Brian was supposed to stay at work last night and sleep outside and due to weather he came home instead. Hooray!

This meal came together pretty quickly (if you don't count the time it takes the rice to cook) and was super delicious. The leftovers were even more flavorful if you can believe it.

Ingredients
- 1 cup uncooked brown rice
- 1 teaspoon turmeric powder
- 1/2 cup frozen peas
- 1/2 cup frozen edamame
- 2 teaspoons fresh grated ginger
- 8 ounces deveined and shelled shrimp
- 2 teaspoons olive oil
- salt and pepper to taste

1.) Bring 2 cups of water to a boil in a small stock pot and add the rice, turmeric and ginger
2.) Reduce the heat to a low simmer and cook with the lid on until tender and all the water is absorbed (adding the peas and edamame when the rice is about 5 minutes away from being cooked)
3.) When the rice is almost done, heat the oil in a small saute pan then add the shrimp
4.) Season the shrimp with salt and pepper and cook until pink and cooked through
5.) Divide the rice into bowls, top with the shrimp and enjoy!


Monday, April 8, 2013

Chicken Ziti Broccoli

Whenever we go out for Italian food, I can pretty much guess what Brian is going to order. Chicken Parmesan or Chicken Ziti Broccoli. Occasionally he surprises me and orders something different but if either of those meals are on the menu it's almost a sure bet.

We didn't feel like going to the grocery store on Saturday morning like we usually do, so I was looking in the refrigerator/freezer/pantry to see what we could make up. When I mentioned that we had broccoli in the refrigerator and chicken in the freezer Brian requested some chicken ziti broccoli.


This recipe came together very quickly and was super delicious. This will definitely be making more appearances in our weekly menus.

Ingdients

- 1 lb chicken breasts
- zest and juice of 1 lemon
- 1 lb pasta (shape of choice)
- 1 head of broccoli chopped in florets
- 1 1/2 cups milk (I had whole on hand but any should work)
- 4 ounces reduced fat cream cheese at room temperature
- 1/2 grated parmesan cheese
- salt and pepper to taste

1.) Salt and pepper the chicken and then rub in about half of the lemon zest. Grill the chicken until cooked through then slice thinly
2.) Cook the pasta according to the package directions adding the broccoli in the last 2 minutes of cooking time, save about 1 cup of cooking liquid before draining
3.) After the pasta is cooked, use the same pot to heat the pasta water, milk, cream cheese and parmesan, whisking to combine
4.) Simmer the sauce until bubbly and slightly thickened then stir in the remaining zest, lemon juice, salt and pepper to taste
5.) In a large bowl, mix together all the ingredients and enjoy!

Saturday, April 6, 2013

Vanilla Pastry Cream and a meal plan

Happy weekend! 

This morning when I woke up, Brian asked what time I had to be at work. I had to remind him that it was the weekend! No work today!

This morning I'm going on a 7 mile run and then out to do some errands. We're trying to keep it low key this weekend and try to really relax.

Earlier in the week I posted about the Perfect Tart Shell. Did you see that yummy creamy filling? It's a great vanilla pastry cream. Pastry cream is very versatile. Ever wonder what's inside an eclair? Pastry Cream. How about Boston cream donuts? Pastry Cream. Hmmm, fruit tarts? Pastry cream.

This is my go to filling for a vanilla creamy center. 

Ingredients, recipe from Smitten Kitchen
- 1 1/4 cups whole milk (you really need whole milk, no skim milk here)
- 1 teaspoon vanilla extract
- 3 large egg yolks
- 1/2 cup granulated sugar
- 3 tablespoons cornstarch
- 3 tablespoons room temperature unsalted butter


1.) In a saucepan, heat the milk to a simmer
2.) Meanwhile, whisk the yolks, sugar and cornstarch until thick and pale
3.) While whisking, slowly drizzle the hot milk mixture into the eggs (tempering). Continue to add milk until the yolks are warmed
4.) Add the yolks to the saucepan and heat over medium heat while whisking until the mixture comes to a bowl (about 1-2 minutes). The mixture will thicken very quickly.
5.) Pour the cream into a large bowl and mix in the vanilla extract
6.) After about 3 minutes, stir in the butter until melted
7.) Cover with plastic wrap, pressing the wrap against the surface of the cream (to prevent a skim from forming) and let cool in the refrigerator
8.) After the cream is cooled, pour into the tart shell or use as a filling


To assemble the fruit tart
- you will also need a variety of fruit, I used a 1 pint of strawberries (washed, hulled and sliced), 1/2 pint blueberries and raspberries (washed and dried)
- you will also need apricot jelly and a pastry brush: Apricot jelly is what gives the amazing shine to tarts. Simply brush the fruit and crust with strained apricot jelly. It helps if you warm up the jelly in the microwave for about 30 seconds to help it spread easily.

1.) Remove the tart shell from the tart pan and place a small amount of jelly on the center of your serving plate before placing the shell on the plate (this helps the tart to stay put and not slide around)
2.) Fill the shell with the pastry cream, smoothing out the top
3.) I start with a layer of strawberries, brush with apricot jelly
4.) Continue to add the rest of your fruit, glazing and you go
5.) Keep the tart in the refrigerator until you are ready to serve. Enjoy!


And now for the meal plan.

Saturday
Chicken Ziti Broccoli

Sunday
Greek Burgers with tzatziki sauce

Monday
Homemade Chicken Pot Pie (remember I have an extra in the freezer)

Tuesday
Left overs

Wednesday
Chicken Chile Verde with Perfect Quinoa 

Thursday
Roasted Salmon

Friday
Date Night!

What are you weekend plans? Any Running?

Thursday, April 4, 2013

Perfect Tart Shell and a Great 5k for Local Runners

Over the Easter weekend I made a fresh berry tart with vanilla pastry cream on a perfect tart shell. The perfect tart shell to me, tastes yummy, is easy to make and doesn't shrink too much. There is nothing worse than opening the oven and finding that your crust has shrunk so small that no filling will fit.

I've been using this recipe from Smitten Kitchen for years and it has never failed me (even at high altitude).

Ingredients
- 1 1/2 cups all-purpose flour
- 1/2 cup confectioner’s sugar
- 1/4 teaspoon kosher salt
- 9 tablespoons (4 1/2 ounces) very cold (or frozen) unsalted butter, cut into small pieces
- 1 large egg

1.) Pulse the dry ingredients together in the bowl of a food processor
2.) Scatter the pieces of butter over the dry ingredients and pulse until the butter is coarsely cut in 
3.) Add the yolk and process until the dough comes together into a ball
4.) Press the dough into a fluted tart pan with a removable bottle (I use the bottom of a measuring cup to make sure it is even)
5.) Freeze the crust for at least 30 minutes or longer
6.) Pierce the dough with a fork (docking) all over to ensure air doesn't get trapped during baking
7.) Preheat the oven to 375 F with a rack in the center
8.) Butter the shiny side of a piece of aluminum foil (or use nonstick foil) and fit the foil, buttered side down, tightly against the crust.
9.) Bake tart crust for 20 to 25 minutes then remove the foil (use a spoon to press down any parts that have puffed)
10.) Bake the crust about 10 minutes longer to fully bake it, or until it is firm and golden brown
11.) Fully cool before filling and Enjoy!


For all you local runners here is a great run for a great cause All in 4 Aldridges 5k run/walk
This run benefits the family of a fellow runner who recently passed away while running. Brian and I will be there so let me know if you are too!

Wednesday, April 3, 2013

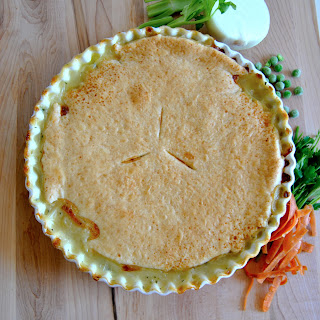
Homemade chicken pot pie

Chicken pot pie is one of those foods that I love but always seem to forget about. Maybe I have deemed it to be too "unhealthy" in my  head or that it takes too long to make. I found a recipe that has no cream, was relatively quick to make and also super delicious.

This meal always easily doubles, which I would recommend because it freezes really well. If you're going to make the mess you might as well make a 2nd to stash in the freezer for a busy night. Or give a pot pie to a friend. I'm sure just about anyone (well except a vegetarian) would appreciate a pot pie gift.

The recipe was adapted from the March 2012 issue of Everyday Food. The directions called for a 2 quart baking dish, which was about the same size of my large pie plate. When I doubled the recipe it actually made enough filling for 3 pot pies (I used foil pie plates for the second and third pies) so now I had one for dinner, gave one to a friend and have one in my freezer. I consider that to be a success!

Pie Crust Ingredients
- 1 1/4 cups all purpose flour
- 1 teaspoon sugar
- 1/4 teaspoon kosher salt
- 1/4 cup (4 ounces) cold unsalted butter
- 3 to 5 tablespoons ice water

1.) In a food processor, combine the dry ingredients with a few pulses 
2.) Cut the cold butter into cubes and scatter on top of the dry ingredients
3.) Pulse the food processor until the butter is broken up and the mixture looks like course meal
4.) Add the water a tablespoon at a time until the dough comes together into a ball. I only needed 3 tablespoons of water for my dough to come together.
5.) Form the dough into a disk, cover with plastic wrap, and let chill in the refrigerator for about 1 hour. 
6.) When you are ready to top your pie, roll out the dough between 2 pieces of parchment paper until the circle is slightly larger than your pie
7.) Tuck any extra dough under itself and cut a few steam vents on top

Pot Pie Ingredients
- 5 tablespoons unsalted butter
- 1 medium yellow onion diced
- 4 medium carrots diced
- 3 sticks of celery diced
- 2 minced gloves of garlic
- 1/2 cup all purpose flour
- 4 cups low sodium chicken broth
- 1 cup frozen peas
- 3 cups shredded chicken
- 1/3 cup chopped parsley

1.) Melt the butter in a large pot then add the onions, carrots, celery and garlic
2.) Saute about 8 minutes or until the vegetables begin to soften
3.) Stir in the flour and cook for about 1 minute
4.) Slowly whisk in the chicken stock until smooth
5.) Bring to a boil then reduce to a simmer, whisk for about 5 minutes or until thickened
6.) Stir in the peas, chicken and parsley then spoon into your dish and top with the pie crust
7.) Bake in a preheated oven to 375 F on a baking sheet (in case it bubbles over) for 45-50 minutes until the crust is golden and the filling bubbling
8.) Let rest for about 15 minutes and then enjoy!


Tuesday, April 2, 2013

Race Recap: Hippity Hop 5K

On Saturday morning Brian and I ran the Hippity Hop 5k in Denver's Central Park. This was the first race we were doing together since last winter sometime? Brian left for a deployment last March and then I had my surgery in December so it had been quite a while since we were able to run a race together. And by together I mean doing one at the same time.

The only times we really run together are on long runs (half marathon or longer) any distance shorter than that Brian is typically faster than me.

It was the perfect day for a race, sunny and in the mid 60s. I underestimated how warm it was going to be a wore a long sleeve shirt, which I came to regret! Man it was hot! Next time I'm going to at least bring a tee shirt with me to change if it's warm.

The race was very well organized. There was plenty of parking and it even had really bathrooms not just porta-potties (always a nice surprise). After getting our bibs and tee shirts we had plenty of time to drop our stuff off in the car and warm/up stretch.

The beginning of the race was pretty narrow so it was difficult to break away from the crowd but by the first 1/2 mile there was plenty of space. The course was made up of 2 loops that covered paved side walks and some trial running. I liked the different parts of the course because it really broke the run up.

The finish line was visible from the course, which I also like. I like to know exactly how much farther I need to go! At the finish line there were plenty of bottles of water and post race snacks including breakfast burritos.


Although this was not my fastest 5k by any means I met my goal pace. I've only been running again for about a month and want to get back into running slowly so I don't get hurt.

Here's my official time:
Chip Time: 00:28:07
Gun Time: 00:28:16
Pace: 9:06 
Overall Place/Total: 47/200
Sexplace/Sextotal:19/121
Divplace/Divtotal: 4/16 00:28:07 (only the top 3 in each age group got a medal...so close)
I'm in the white shirt
I would definitely consider this race again next year and recommend it to any local runners. It was a nice flat course with easy parking. What more could you ask for?

Monday, April 1, 2013

Fabulous Herb Sauce

Nothing gets to me more than when you have a partially used bunch of herbs and you don't know what to do with the rest so they end up getting thrown away. I found myself in this situation far too often over the summer when I was getting multiple bunches of herbs through my CSA (community shared agriculture) share. It was time to get creative to make something wonderful.

I decided to throw a bunch of herbs, lime zest and juice and olive oil in a food processor and to see what would happen. The result was a cross between a pesto and a chimichurri sauce.


This herb sauce is very flexible with it's ingredients. I try to stay with about 2 cups of fresh herbs and the zest of 1 citrus fruit. Play around with the flavors and use what you have on hand! This sauce also freezes really well. That way you can have jars of summer ready to brighten up any meal even in the dead of winter.

Ingredients
- 1 cup parsley leaves/stems
- 1 cup cilantro leaves/stems
- 1/3 cup olive oil
- 1/4 teaspoon red pepper flakes
- zest and juice of 1 lime
- salt and pepper to taste

1.) Add all the ingredients in a food processor and run until a sauce is formed
2.) Use as a dip, sauce, marinade, topping, etc and Enjoy!

I used this sauce as a marinade for some pork tenderloins that we grilled as well as a sauce for the pork. It was also an amazing spread on a turkey sandwich.